
Server Hosting
Host a Dedicated Evrima Server
Run your own dedicated The Isle: Evrima server on Windows — set a static IP, forward the ports, install via SteamCMD, drop in two config files, and launch with an auto-restarting batch script. From clean machine to live server it's about an hour if everything goes smoothly.
Setup: Static IP
A static IP keeps your server's LAN address from changing every time the PC reboots. Without it, your port-forwarding rules go stale.
Find your current IPv4
- Press Win, type
cmd, right-click Command Prompt → Run as administrator. - Type
ipconfigand press Enter. - Note the IPv4 Address, Subnet Mask, and Default Gateway for the adapter you use (Ethernet or Wi-Fi).
Pin the IP
- Open Control Panel → Network and Sharing Center → Change adapter settings.
- Right-click your adapter (Ethernet / Wi-Fi) → Properties.
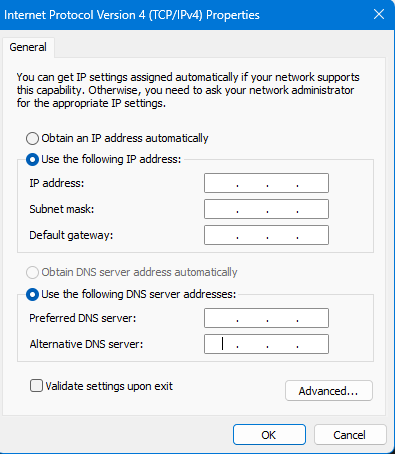
- Select Internet Protocol Version 4 (TCP/IPv4) → Properties.
- Choose Use the following IP address and enter the IPv4, Subnet Mask, and Default Gateway from the previous step.
- For DNS, your ISP's defaults work — or use Google's public DNS
8.8.8.8/8.8.4.4. - Tick Validate settings upon exit and click OK.
Setup: Port Forwarding
Evrima dedicated servers need ports open through your router and through Windows Firewall on the host PC.
| Purpose | Port(s) | Protocol |
|---|---|---|
| Game (player connections) | 7777 | UDP |
| Game (range, for multi-server hosts) | 7777–7779 | UDP |
| Queue | 10000 | TCP |
| RCON (admin) | 8888 | TCP |
On the router
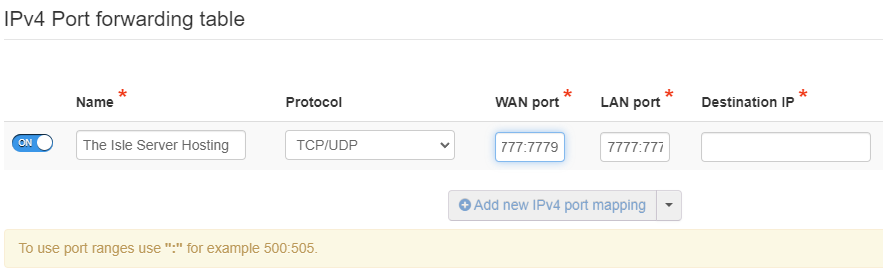
- Open your router's admin page (the Default Gateway IP from Step 01 — usually
192.168.0.1or192.168.1.1). - Find the section labelled Port Forwarding / WAN Services / Virtual Servers (varies by brand).
- Add a UDP rule for
7777(or range7777:7779) pointed at the static IP you set in Step 01. - Add TCP rules for
8888(RCON) and10000(Queue) to the same static IP. - Save / Apply.
On the Windows host
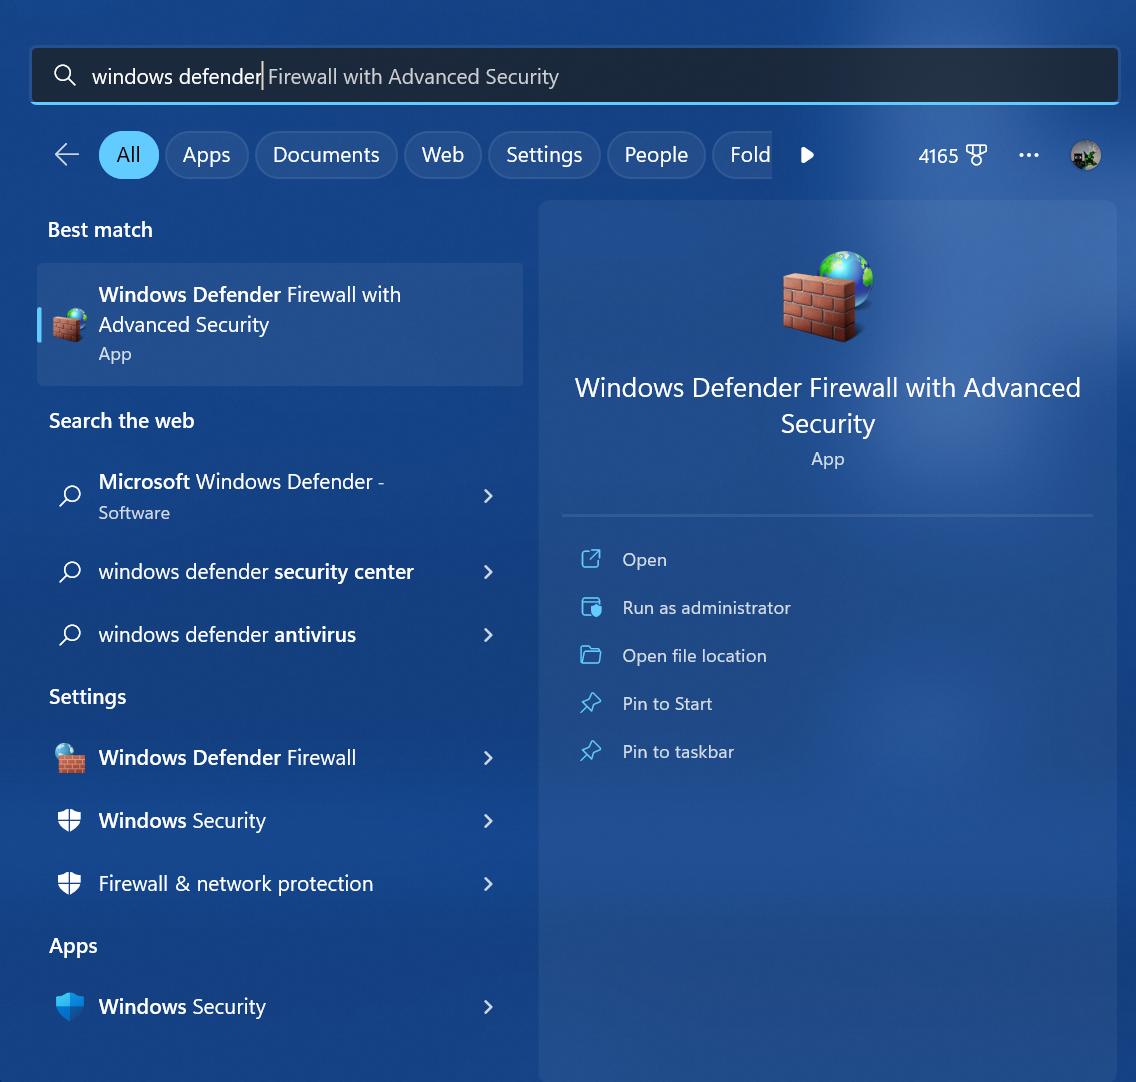
- Press Win, type
Windows Defender Firewall with Advanced Security, open it. - Click Inbound Rules → New Rule.
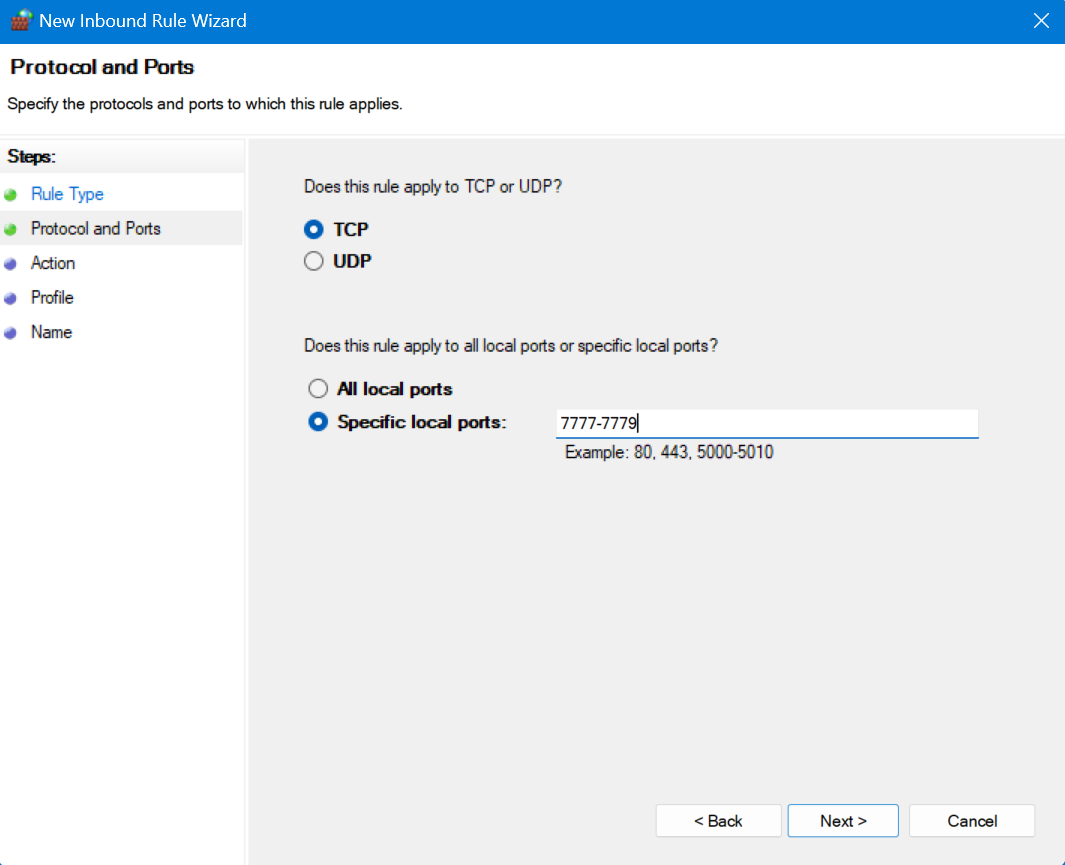
- Rule type Port → UDP → Specific local ports:
7777-7779. - Allow the connection. Apply to Domain / Private / Public. Name it something obvious like
TheIsle UDP. - Repeat as a second rule for TCP ports
8888,10000.
Setup: SteamCMD
SteamCMD is Valve's command-line client for downloading dedicated-server binaries. Grab it from the official Valve developer docs, extract it, and run steamcmd.exe once to let it auto-update.
Install the Evrima dedicated server
- Create an empty folder for the server, e.g.
C:\theisleserver. - In SteamCMD, type
login anonymousand press Enter — you should get a Logged in OK line. - Set the install directory:
force_install_dir C:\theisleserver - Install the server:
app_update 412680 -beta evrima validate(Steam app ID 412680 = The Isle Dedicated Server) - When the download finishes, type
quit.
Setup: Server Settings
Two files: Game.ini for everything you can tune (server name, mutations, allowed species, RCON, etc.) and Engine.ini for the EOS dedicated-server identity that lets the server start.
Path: C:\theisleserver\TheIsle\Saved\Config\WindowsServer\
If WindowsServerdoesn't exist, create it. Make sure file extensions are visible (File Explorer → … → Options → View → uncheck Hide extensions for known file types) so you save a real .ini and not Game.ini.txt.
Game.ini
Starter template — paste this into your empty Game.ini and tweak from there.
[/script/theisle.tigamesession]
ServerName=My Evrima Server
MaxPlayerCount=100
bEnableHumans=false
MapName=Gateway

bQueueEnabled=true
QueuePort=10000
QueueJoinTimeoutSeconds=30
QueueHeartbeatIntervalSeconds=8
QueueHeartbeatTimeoutSeconds=5
QueueHeartbeatMaxMisses=2

bServerPassword=false
ServerPassword="ChangeMe"
bRconEnabled=true
RconPassword="ChangeMeToSomethingLong"
RconPort=8888
QueryPort=7777

bServerDynamicWeather=true
MinWeatherVariationInterval=600
MaxWeatherVariationInterval=900
ServerDayLengthMinutes=45
ServerNightLengthMinutes=20

bServerWhitelist=false
bEnableGlobalChat=false
bSpawnAI=true
AISpawnInterval=40
AIDensity=1

bEnableMigration=true
MaxMigrationTime=5400
SpeciesMigrationTime=10800
bEnableMassMigration=true
MassMigrationTime=43200
MassMigrationDisableTime=7200
bEnablePatrolZones=true

bEnableDiets=true
GrowthMultiplier=1
bServerFallDamage=true
bAllowRecordingReplay=true
bSpawnPlants=true
PlantSpawnMultiplier=1
bEnableMutations=true
bUseRegionSpawning=true
bUseRegionSpawnCooldown=true
RegionSpawnCooldownTimeSeconds=30
CorpseDecayMultiplier=1
Discord="https://discord.gg/YourInviteHere"

[/script/theisle.tigamestatebase]
AdminsSteamIDs=YourSteamID64
WhitelistIDs=
VIPs=
AllowedClasses=Tyrannosaurus
AllowedClasses=Allosaurus
AllowedClasses=Carnotaurus
AllowedClasses=Ceratosaurus
AllowedClasses=Deinosuchus
AllowedClasses=Triceratops
AllowedClasses=Stegosaurus
AllowedClasses=Diabloceratops
AllowedClasses=Kentrosaurus
AllowedClasses=Tenontosaurus
AllowedClasses=Maiasaura
AllowedClasses=Pachycephalosaurus
AllowedClasses=Dryosaurus
AllowedClasses=Hypsilophodon
AllowedClasses=Gallimimus
AllowedClasses=Baryonyx
AllowedClasses=Dilophosaurus
AllowedClasses=Herrerasaurus
AllowedClasses=Austroraptor
AllowedClasses=Beipiaosaurus
AllowedClasses=Troodon
AllowedClasses=Omniraptor
AllowedClasses=Pteranodon
Engine.ini
Required for the server to authenticate with Epic Online Services. Without these two lines the server won't start.
[EpicOnlineServices]
DedicatedServerClientId=<your-eos-dedicated-server-client-id>
DedicatedServerClientSecret=<your-eos-dedicated-server-client-secret>
Substitute the two values from your dedicated-server install — they ship as part of the standard Evrima server template and are the same across every host. If you don't have them yet, install the server first (Step 03) and look for the EOS block in the install's default config.
Info: Game.ini Configuration
| Key | Value / Effect |
|---|---|
| ServerName | Display name in the in-game server browser. |
| MaxPlayerCount | Slot cap. >100 is unstable territory. |
| bEnableHumans | true / false — enables the human flashlight mode. |
| MapName | Gateway (the active Evrima map). |
| bServerPassword / ServerPassword | Gate the server with a password. |
| bRconEnabled / RconPassword / RconPort | RCON admin access — keep the password private. |
| bQueueEnabled / QueuePort | Lets players queue when the server is full. |
| ServerDayLengthMinutes / ServerNightLengthMinutes | Day / night cycle length in minutes. |
| bServerDynamicWeather | Toggle the dynamic weather system. |
| GrowthMultiplier | Universal growth speed. Stay under ~40. |
| bEnableMutations | Toggle the entire mutation system. |
| bEnableDiets | Toggle diet macros (carnivore / herbivore food categories). |
| bSpawnAI / AIDensity / AISpawnInterval | AI critters (boar/deer/etc.) toggle, density, cadence. |
| bEnableMigration / bEnableMassMigration | Migration zones + mass migrations. |
| bUseRegionSpawning | Region picker on character select. |
| AdminsSteamIDs / VIPs / WhitelistIDs | SteamID64 lists for elevated roles + (optional) whitelist. |
| AllowedClasses | One line per playable species (case-sensitive class names). |
| Discord | URL behind the in-server Discord button. |
Setup: Launch Options and Command line
Two paths — pick whichever you'll actually use. The batch script is the production-grade option because it auto-updates and auto-restarts on crash.
Option A — Quick shortcut (single launch, no auto-restart)
- Right-click
TheIsleServer.exe→ Create shortcut (or Send to → Desktop). - Right-click the shortcut → Properties.
- In the Target field, after the existing path, append:
?Port=7777 -log -ini:Engine:[EpicOnlineServices]:DedicatedServerClientId=<your-eos-dedicated-server-client-id> -ini:Engine:[EpicOnlineServices]:DedicatedServerClientSecret=<your-eos-dedicated-server-client-secret>Substitute the real EOS values from your install. Match ?Port= to the port you forwarded. Note: the Target field has a character limit, so keep your install path short.
Option B — Batch with auto-update + auto-restart (recommended)
Create a file like IsleServer_Start.bat (any folder works — the server directory is fine) and paste the following. Update the SteamCMD and server paths to match your install.
@echo off
cls
title The Isle Evrima — My Server
:TheIsle
echo (%time%) Checking for updates...
start /wait C:\steamcmd\steamcmd.exe +force_install_dir C:\theisleserver +login anonymous +app_update 412680 -beta evrima validate +quit
echo (%time%) Starting Isle server...
start /wait C:\theisleserver\TheIsleServer.exe /Game/TheIsle/Maps/Game/Gateway/Gateway?Port=7777 -log -ini:Engine:[EpicOnlineServices]:DedicatedServerClientId=<your-eos-dedicated-server-client-id> -ini:Engine:[EpicOnlineServices]:DedicatedServerClientSecret=<your-eos-dedicated-server-client-secret>
echo (%time%) Server stopped or crashed — restarting in 60s.
timeout /t 60
goto TheIsle
If you already added the [EpicOnlineServices] block to Engine.ini in Step 04, you can drop the two -ini:Engine: overrides from the launch line.
Setup Finished!
Launch the shortcut or batch and watch the log window. Once you see the server register successfully with EOS and start listening, it's live.
- On a different machine (or your phone's mobile hotspot), launch The Isle, set the Session Filter to Unofficial, and search for your
ServerName. - If it shows up — congrats, you're live. If it doesn't:
- Confirm both the UDP and TCP firewall rules are allow inbound.
- Confirm the router rule's destination IP matches your current static IP.
- Check the server log window for EOS authentication errors — usually means
Engine.iniisn't being read.
- Try the Steam Game Servers route from your test machine as a second-look check.
Credits by: StolidSnow0
Don't feel like all that?
Skip the setup — join an already-built server
Custom progression, Elder Prime tier ladder, daily rewards, proximity voice chat, custom skins, active staff, 24/7 uptime — already shipped and running. Hop in instead of spending an evening with router admin panels.
See the server →What's next
- • Promote it. Pick a name, set up a Discord, and post the join instructions where your future regulars hang out.
- • Lock RCON. Set a long random
RconPasswordand never paste it in public. - • Back up your
TheIsle\Saved\directory regularly — that's where player data and world state live.