
Game Systems
Combat & Damage Types
Last updated: May 28, 2026
Combat in The Isle: Evrima isn't about left-clicking until something dies. It's a stamina, positioning, and damage-type chess game where the wrong choice in the first three seconds usually decides the fight. Every species has a different toolkit, and every damage type has a different counter. This page is the reference for all of it.
Attack controls — the bind reference
Every species shares the same core bind layout. Specific effects vary, but the buttons are consistent.
| Bind | Name | What it does |
|---|---|---|
| LMB | Primary attack | Standard bite. Default lethal-damage attack. |
| RMB | Secondary attack | Muzzle swing / kick / shove. Often non-lethal but stagger/knockback-capable. Species-specific. |
| Alt + LMB | Alt-primary | Directional / charged variant. Often the species' signature ability (Carno Charge, Teno Rear Kick, Stego Tail Slam, etc.). |
| Alt + RMB | Alt-secondary | Directional muzzle swing for some species — Tyrannosaurus uses this. |
| E (hold) | Buck / clear effects | Costs stamina. Bucks latched pouncers off. Also clears blindness. |
| G | Lie down / rest | Speeds up bleed recovery and HP regen. Vulnerable while down — pick safe ground. |
| Spacebar | Ambush / sprint burst | Tyrannosaurus subadult+ gets a temporary sprint-speed boost on a cooldown. Other species may use spacebar differently. |
The six damage types
Most fights involve at least two of these layered together. Knowing which one is active on your bar — and how to clear it — is the difference between escaping and getting picked apart.
Raw damage
- Sources:
- Every bite. Primary attack (LMB) on basically every species.
- What it does:
- Direct HP reduction. The base damage scaled by bite force and the attacker's growth stage.
- Counter:
- Tank it or avoid it. HP regen handles small chip; bigger hits need downtime.
Bleed
- Sources:
- Carnotaurus, Allosaurus, raptors (Herrera / Omni / Austro), Troodon, several others on specific attacks.
- What it does:
- A damage-over-time effect that ticks while you move. Leaves a visible blood trail that lets predators follow you.
- Counter:
- Stop running. Lie down (default G) to heal bleed faster. The longer you stay still, the quicker it clears. Running while heavily bleeding is the fastest way to die.
Fracture
- Sources:
- Heavy crushing attacks — Tyrannosaurus Crush, Pachycephalosaurus headbutt (the headbutt is literally a bone-breaker), large herbivore tail slams, fall damage on smaller species.
- What it does:
- A persistent debuff that slows movement and adds locked HP. Doesn't tick damage, but you can't recover the locked health until the fracture heals.
- Counter:
- Time. Stay safe and let it recover. Mutations like Osteosclerosis reduce fracture risk. The Osteophagic mutation lets you eat bones to heal fractures faster.
Bacteria
- Sources:
- Ceratosaurus bite. Cera builds bacterial reserves by eating rotten meat (or just any meat).
- What it does:
- If bacteria stacks high enough relative to your stomach fill, you start vomiting — wasting your food and damage. More diet = more bites before vomiting hits. Bacteria amount per bite scales inversely with target weight (small dinos take a full dose in one bite; large ones need multiple).
- Counter:
- Go lick a Salt Rock. Bacteria clears via salt lick, same as how you swap nutrients.
Venom
- Sources:
- Troodon bite + pounce. Austroraptor (Hordetest variant).
- What it does:
- A staged DOT that ramps over time. The effect lasts ~45 seconds and stacks through stages. At stage 3, the target's stamina and HP both drain noticeably.
- Counter:
- Outlast it. Disengaging breaks the chase but the timer still runs. Coordinated pack bites reset the stages if you all hit at the same time — Troodon packs should stagger their bites until stage 3, then commit.
Blindness / Spit
- Sources:
- Dilophosaurus and Hypsilophodon spit attacks. Both produce the spit from stomach contents — you have to be fed to spit.
- What it does:
- Drastically reduces your sight range. Combat becomes guesswork; predators move in. Hypsi's blind acid is the textbook small-prey defense.
- Counter:
- Hold E to clear it. The blindness wears off but you can speed it up. Stay near cover so you're not exposed during the recovery.
Reading your dinosaur's health — the no-bar system
The Isle: Evrima doesn't give you an HP bar. Your health is communicated entirely through visual wounds on your dino's body and blood splatter on your screen edges. Reading this correctly is the difference between escaping a fight at 35% and dying because you thought you were at 60%.
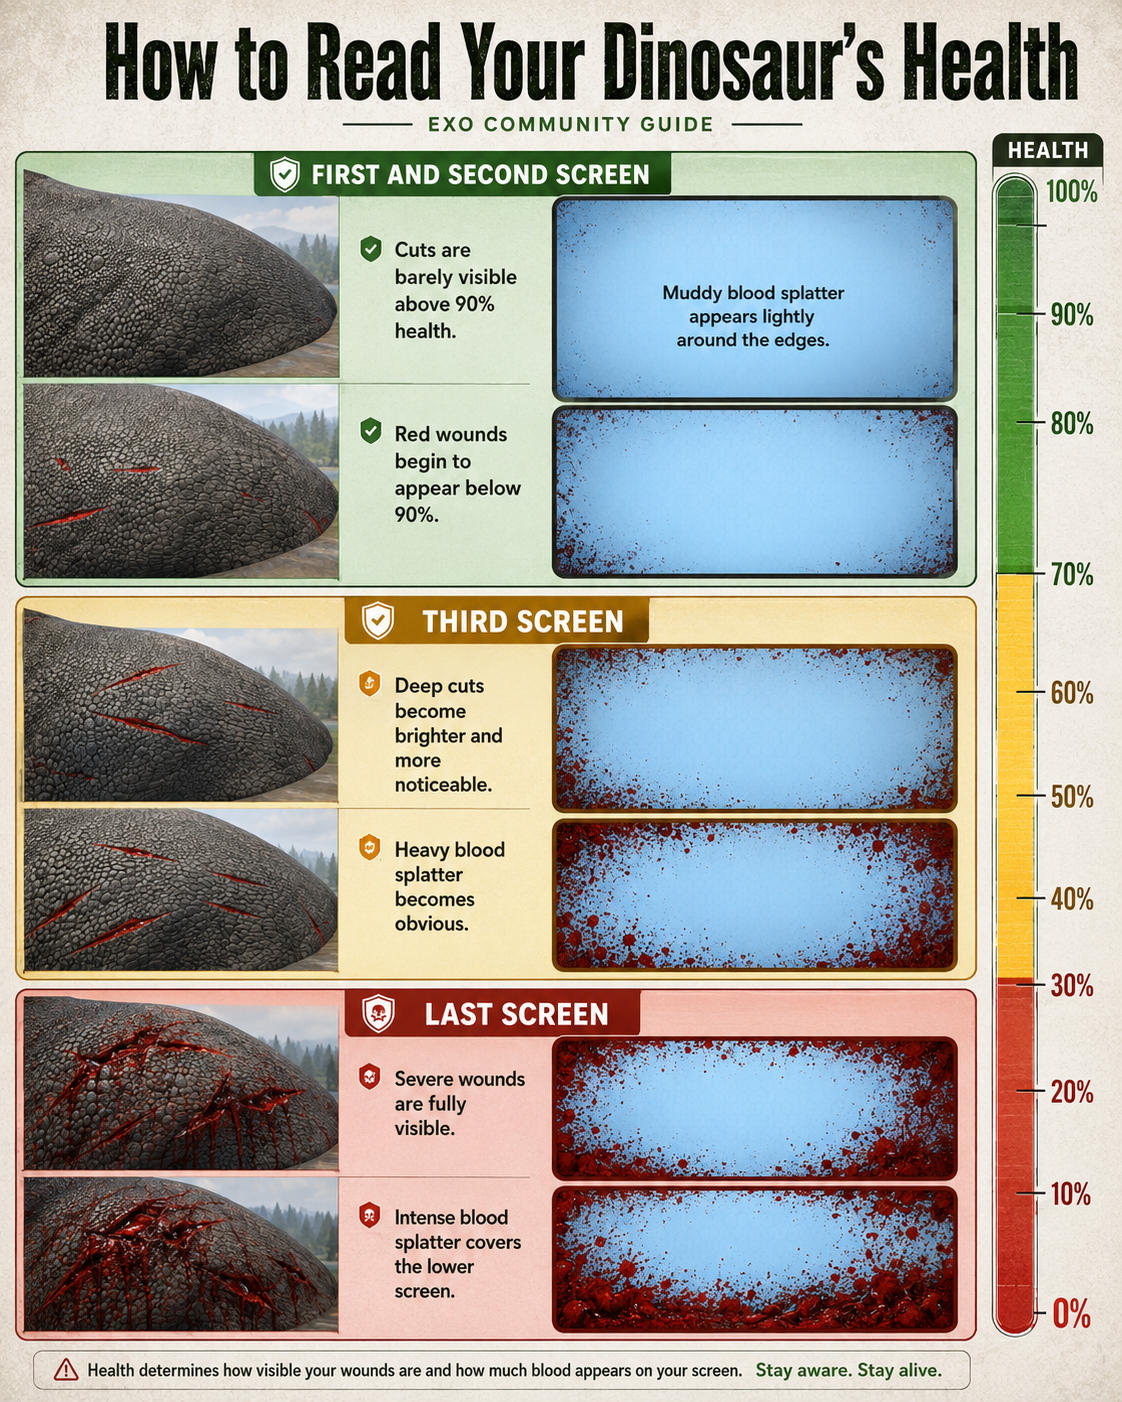
- ~90–100% (First/Second screen): cuts are barely visible. Light, muddy blood splatter around the screen edges. You're fine.
- ~70–90%: red wounds start appearing on the body. Edge splatter gets denser. Still combat-ready.
- ~40–70% (Third screen): deep cuts become brighter and obvious. Heavy blood splatter covers more of the screen. You should think about disengaging.
- ~0–30% (Last screen): severe wounds fully visible across the body. Intense splatter floods the lower portion of the screen. Run, hide, or die.
Train yourself to glance at the edges of your screen mid-fight. The splatter is a faster read than rotating your camera to inspect your own body. New players who aren't used to this die at 30% thinking they had a buffer.
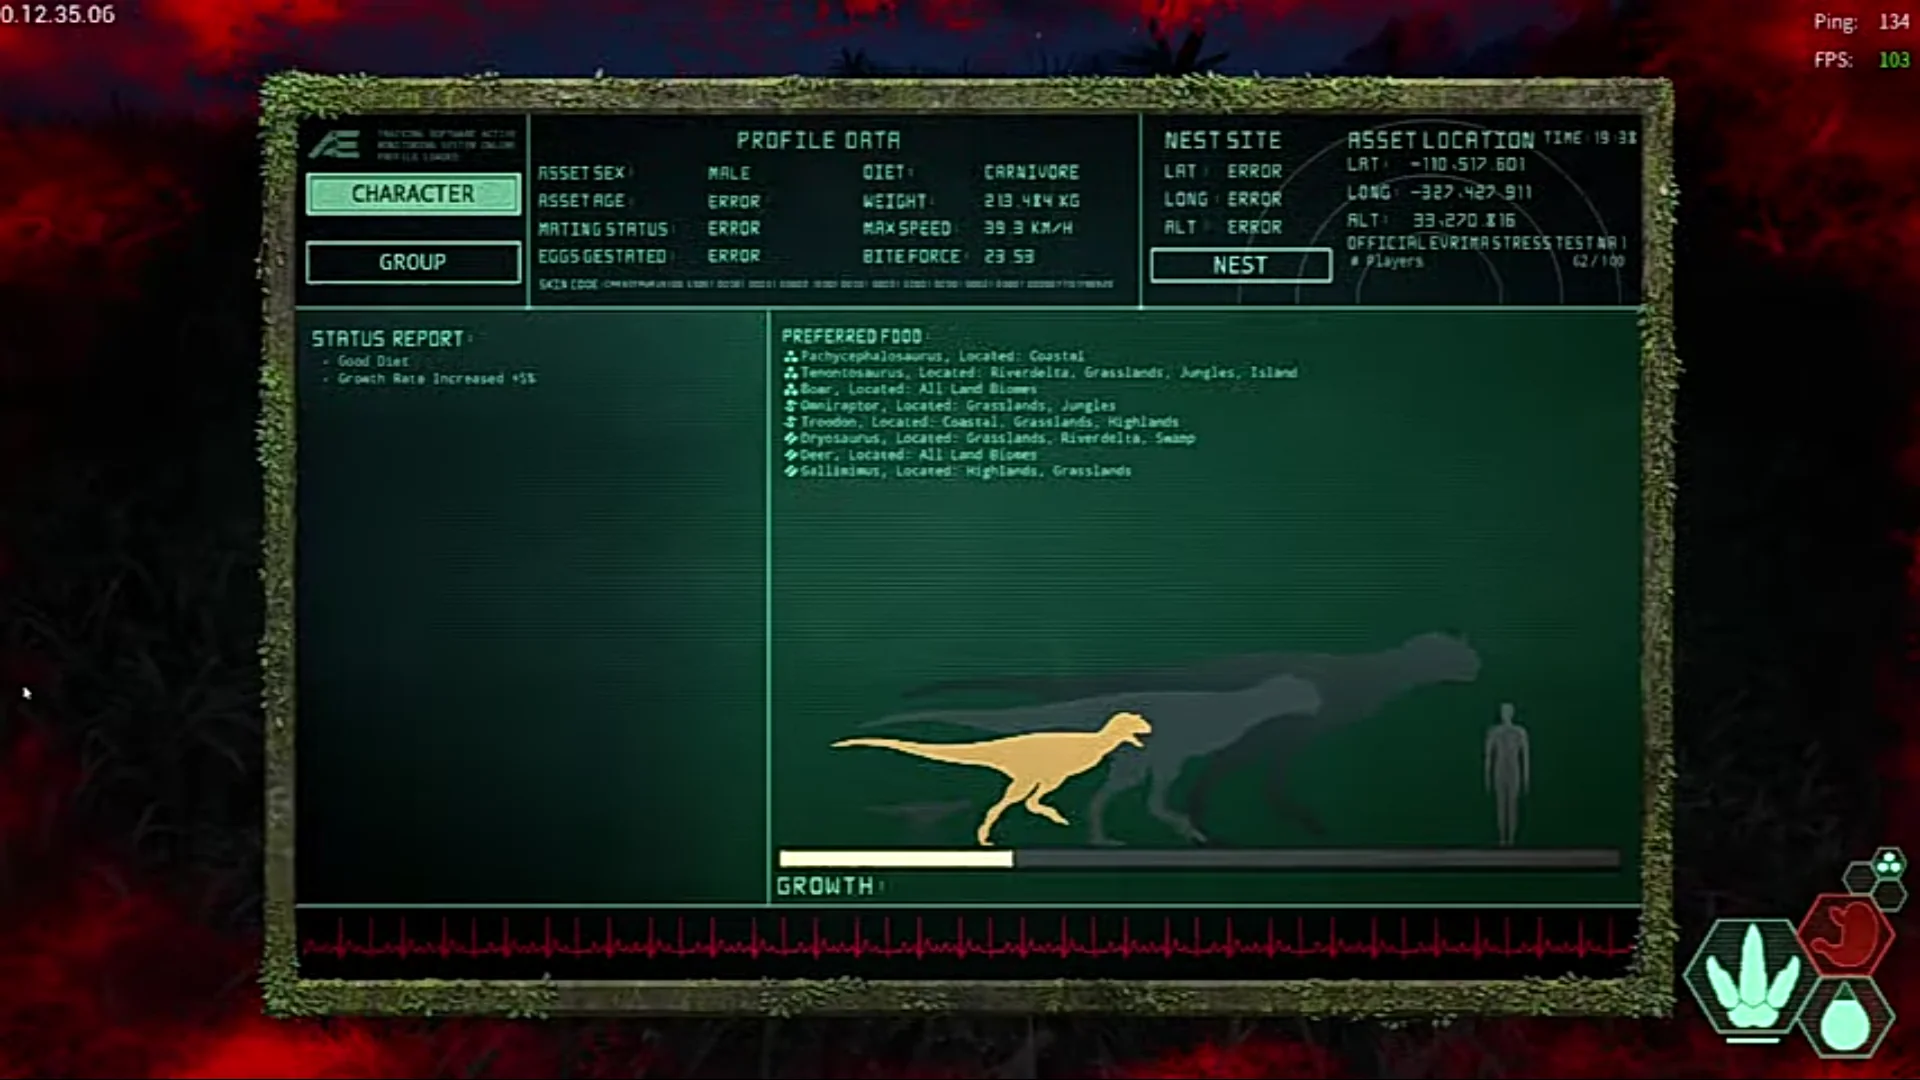
The Status Report — and the heartbeat line
Press Tab at any time to open your Status Report. Beyond the diet/preferred-food panels, the bottom of the screen runs a continuous EKG-style heartbeat line that color-codes your vitals at a glance:
- Green — healthy. Heart-rate steady, no problems.
- Yellow / Orange — moderate damage or low stat (hunger, thirst, stamina, blood). Manageable but pay attention.
- Red — critical. You're bleeding heavily, starving, dehydrated, or about to die. Disengage NOW.
The heartbeat is the fastest overall-status check in the game. If you only have a second mid-fight, glancing at the EKG color tells you more than the wound model because it reflects all your vitals together, not just HP.
Stagger & knockdown — losing your footing
Stagger and knockdown are control effects: they don't deal damage directly, but they interrupt what you're doing and create a window for follow-up hits. After Update 6.5, stagger was removed from most attacks and is now limited to a short list.
- Carnotaurus Charge(Alt + RMB hold) — knocks you down on impact if you're small enough. The Carno's headline move.
- Tenontosaurus Tail Slam & Rear Kick— stagger anything that isn't a heavyweight. Don't fight Tenos from behind.
- Pachycephalosaurus headbutt (Alt-attack)— Pachy's signature move. Built for breaking bones — applies fracture on impact and staggers similar-sized opponents. Also used to parry other headbutting species.
- Gallimimus dash kick — knocks down small targets if Galli builds speed first.
- Tyrannosaurus Muzzle Swing (RMB) — knocks down smaller targets; heavy version (hold RMB) can kill or stagger similar-sized.
If you're a smaller / mid species, every stagger source above is something you need to circle, not face-tank. Once you're on the ground, the follow-up usually kills you before you can stand up.
Pounce, grapple & bucking
Pouncing is a primary ability for several species, not just the small carnivores. The pouncer list:
- Troodon — venom on pounce. Pack-coordinated stage-3 burst is the playstyle.
- Omniraptor — bleed on pounce. Pack pouncers spread across body slots.
- Herrerasaurus — pounce + climb. Wall-latch into drop-pounce is a real combo.
- Austroraptor — Hordetest pounce species. Different flavor of pouncer that mixes with water attacks.
- Hypsilophodon — small pounce + acid spit blindness. Mostly a harasser, not a killer.
- Allosaurus — yes, Allo is a pouncer. Its signature ability lets it pull a victim down or pull itself on top depending on the size matchup. Heavyweight class pouncer — very different from the small-carnivore version.
Pouncers win fights by latching onto a bigger target instead of trading bites. The whole system has its own rules:
Pouncing
- Slot system: each pouncer takes a slot on the target's body (back, flank, head, etc.). Pack pouncers each land in a different slot so they don't overlap. Players can manually swap slots mid-grapple (costs stamina).
- Damage control: while latched, you can tap or hold primary for raw damage, or tap/hold secondary for bleed damage. Both spend stamina; mix them based on what stage of the fight you're in.
- Miss recovery: missed pounces no longer stun the pouncer. Larger species can still attack you while you're on their back.
- Fall risk: as of patch 0.20.109, pouncers can die from fall damage if their target leaps off a cliff or ledge while latched. Watch the terrain — clever prey use the map against you.
Bucking (defender side)
- Hold E to buck. Costs stamina, ramps up over time.
- 2-second grace window: bucking is safe for the first two seconds before the opponent can begin counter-bucking / resisting.
- % chance to succeed: bucking can throw an attacker even if their stamina isn't fully drained — there's a roll on each attempt.
- Dismount animation (as of 0.18.11): a successful buck plays a proper throw animation instead of just dropping the pouncer straight down.
- Grapple weight threshold (0.18.11): changed from 65% → 101%, widening which targets can be pounced.
Movement, turn radius & stamina

Your effective combat ability is gated by stamina, and your turn radius depends on how fast you're moving. Mismanage either and a slower opponent will out-circle you. The icon to the left is the stamina HUD glyph — keep an eye on it before committing to anything that costs sprint.
- Slower = tighter turns. Walking turns sharpest. Trotting is the sweet spot for most combat. Sprinting commits you to wide arcs — never sprint-turn against a more agile species. If a raptor is circling your Carno, drop to trot and force them to commit.
- Stamina is your fuel — and your defense. Empty stamina means you can't buck, can't sprint to disengage, can't attack. Conserve aggressively; pace bites; don't sprint between attacks unless you're closing the kill.
- Sprint regen has a threshold. Stamina won't start refilling until you stop sprinting AND drop below the regen-block ceiling. The Multichambered Lungs mutation raises that threshold so you can fight while regenerating.
Combat roles by species class
Different species play different roles. Treating a small carnivore like a brawler or a heavyweight like a circler gets you killed. Rough archetypes:
Pouncers / Skirmishers
Troodon · Herrera · Omni · Austro · Hypsi · Allo (heavy)
Latch, apply DOT (bleed / venom), disengage before being bucked. You win wars of attrition, not face-trades. Coordinate with pack to stack damage types. Allo plays this role at the heavyweight tier — pulling targets down rather than latching like the small species.
Mid-tier brawlers
Carno · Dilo · Cera · Diablo · Pachy · Maia
Hit-and-run with alt-attacks (charge, headbutt, kick). Set up combos and control space; avoid drawn-out slugfests with heavies. Use turn-radius advantage against bigger species.
Heavyweights
Stego · Trike · Allo · Deino · Rex
High HP + huge damage but slow turns. Protect your flanks. Never let a small predator get behind you. Use stagger attacks to lock down chasers; let bleed and fracture do the slow work.
Herbivore defenders
Teno · Stego · Trike · Kent · Pachy
Tail slams, thagomizers, rear kicks. Position your tail toward predators; never get sandwiched. Groups multiply your effective threat — pack with other species when possible.
Group & pack combat
The game heavily rewards coordinated groups — both as defenders and attackers. Solo fights are losable; group fights are tilted.
- Herbivore packs (mixed-species OK): a Trike + Stego + Maia combination covers front, rear, and flanks. Any solo carnivore that engages a herd of three correct-positioned herbivores usually dies trying.
- Carnivore pack pouncing: assign slots before engaging. Troodon pack should stagger venom bites until stage 3, then commit all at once. Omni pack should split latches across different body slots so they don't overlap.
- Beware friendly bites: hit boxes are wide. Your pack can damage each other in close-quarters scrums. Position so attacks don't cross.
Common combat mistakes
- • Running while bleeding. Movement accelerates bleed damage. Get out of sight, lie down, heal. Don't sprint away and bleed out 200m down the road.
- • Spamming primary attack. Alt-attacks usually do more damage or apply better effects. Spammed primary bites burn your stamina without committing to a real opening.
- • Sprint-turning under pressure. Your turn radius is widest at sprint. Drop to trot if something faster is circling you. A slower opponent who out-turns you wins.
- • Pouncing without backup. Solo pouncers can be bucked, fall-killed, or just outlasted. The whole archetype depends on pack coordination. Find a friend before you commit.
- • Ignoring fracture stacks. Fracture locks HP. Even if you escape the fight at “full health”, you're effectively at 70% capacity until it heals. Disengage means disengage; don't go straight back into the fight.
- • Fighting without checking stamina. Check your stamina bar before every commitment. Empty stamina = no buck, no sprint, no alt-attack. You become a stationary punching bag.
Related
- • Mutations — Osteosclerosis (fracture resist), Epidermal Fibrosis (bleed resist), Multichambered Lungs (stamina threshold), and others all change how combat plays.
- • Prime & Prime Elder — Prime status raises your stat caps for the 75–87% growth window.
- • Diet & Nutrients — full 3-combo diet gives HP, fracture, and bleed regen buffs that matter mid-fight.
- • Dinosaur roster — every species page lists its specific abilities + signature attacks.
Combat values, damage scaling, and ability behavior shift between balance patches. The mechanics above are stable; specific numbers move when Afterthought re-tunes a species.